Title here
Summary here
Adesso cerchiamo di capire come poter aggiornare
in modo efficace, tramite RAUC,
anche il FIP che viene eseguito dal TFA,
ovvero il binario in cui sono contenuti
UBOOT e OPTEE assieme ai loro device tree.
Non è sensato rimpiazzare direttamente il
FIP che viene utilizzato dal TFA,
perchè in caso di errori durante l’installazione
o errori nel codice che viene caricato,
rischiamo di trovarci con un sistema unbootable,
visto che solo TFA riuscirebbe a partire,
ma da solo non è abbastanza utile.
Potrebbe essere in grado di caricare Linux
per conto suo, ma questa è un’altra storia.
Per fortuna il meccanismo di multi-bank update
è già presente in TFA.
Addirittura esiste un
documento ufficiale
di ARM che spiega il funzionamento di questo meccanismo.
Cominciamo.
Nel codice del TFA
troviamo la funzione di inizializzazione dello stage bl2,
ovvero l’ entrypoint del bootloader,
e vediamo:
101#if PSA_FWU_SUPPORT
102	if (plat_fwu_is_enabled()) {
103		fwu_init();
104	}
105#endif /* PSA_FWU_SUPPORT */
tale funzione è definita in:
268/*******************************************************************************
269 * Load verified copy of FWU metadata image kept in the platform NV storage
270 * into local FWU metadata structure.
271 * Also, update platform I/O policies with the offset address and length of
272 * firmware-updated images kept in the platform NV storage.
273 ******************************************************************************/
274void fwu_init(void)
275{
276	/* Load FWU metadata which will be used to load the images in the
277	 * active bank as per PSA FWU specification
278	 */
279	int result = fwu_metadata_load(FWU_METADATA_IMAGE_ID);
280
281	if (result != 0) {
282		WARN("loading of FWU-Metadata failed, "
283		     "using Bkup-FWU-Metadata\n");
284
285		result = fwu_metadata_load(BKUP_FWU_METADATA_IMAGE_ID);
286		if (result != 0) {
287			ERROR("loading of Bkup-FWU-Metadata failed\n");
288			panic();
289		}
290	}
291
292	is_metadata_initialized = true;
293
294	plat_fwu_set_images_source(&metadata);
295}
questa effettua una chiamata ad un metodo metadata load,
il quale identifica la partizione avente come codice di tipo della partizione (GUID)
GUID=8A7A84A0-8387-40F6-AB41-A8B9A5A60D23,
come da specifica di ARM.
Queste e altre costanti sono definite in:
268#define EFI_GUID(a, b, c, d0, d1, d2, d3, d4, d5, d6, d7) \
269	{ (a) & 0xffffffffU,		\
270	  (b) & 0xffffU,			\
271	  (c) & 0xffffU,			\
272	  { (d0), (d1), (d2), (d3), (d4), (d5), (d6), (d7) } }
273
274#define FWU_METADATA_GUID \
275	EFI_GUID(0x8A7A84A0U, 0x8387U, 0x40F6U, \
276		 0xABU, 0x41U, 0xA8U, 0xB9U, 0xA5U, 0xA6U, 0x0DU, 0x23U)
277
278#define NULL_GUID \
279	EFI_GUID(0x00000000U, 0x0000U, 0x0000U, 0x00U, 0x00U, \
280		 0x00U, 0x00U, 0x00U, 0x00U, 0x00U, 0x00U)
La cosa interessante però è la chiamata alla funzione
plat_fwu_set_images_source
specifica per la piattaforma, nel nostro caso ST.
Infatti la sua definizione la troviamo all’interno della cartella
plat/st.
Il seguente file racchiude molte delle funzioni specifiche per st
ed in comune tra le serie MP1 e MP2.
Vediamo la parte che però interessa a noi.
857void plat_fwu_set_images_source(const struct fwu_metadata *metadata)
858{
859	unsigned int i;
860	uint32_t boot_idx;
861	const partition_entry_t *entry __maybe_unused;
862	const struct fwu_image_entry *img_entry;
863	const void *img_type_guid;
864	const void *img_guid;
865	io_block_spec_t *image_spec;
866	const uint16_t boot_itf = stm32mp_get_boot_itf_selected();
867
868	boot_idx = plat_fwu_get_boot_idx();
869	assert(boot_idx < NR_OF_FW_BANKS);
870	VERBOSE("Selecting to boot from bank %u\n", boot_idx);
871
872	img_entry = (void *)&metadata->fw_desc.img_entry;
873	for (i = 0U; i < NR_OF_IMAGES_IN_FW_BANK; i++) {
874		img_type_guid = &img_entry[i].img_type_guid;
875
876		img_guid = &img_entry[i].img_bank_info[boot_idx].img_guid;
877
878		image_spec = stm32_get_image_spec(img_type_guid);
879		if (image_spec == NULL) {
880			ERROR("Unable to get image spec for the image in the metadata\n");
881			panic();
882		}
883
884		switch (boot_itf) {
885#if (STM32MP_SDMMC || STM32MP_EMMC)
886		case BOOT_API_CTX_BOOT_INTERFACE_SEL_FLASH_SD:
887		case BOOT_API_CTX_BOOT_INTERFACE_SEL_FLASH_EMMC:
888			entry = get_partition_entry_by_guid(img_guid);
889			if (entry == NULL) {
890				ERROR("No partition with the uuid mentioned in metadata\n");
891				panic();
892			}
893
894			image_spec->offset = entry->start;
895			image_spec->length = entry->length;
896			break;
897#endif
898#if STM32MP_SPI_NOR
899		case BOOT_API_CTX_BOOT_INTERFACE_SEL_FLASH_NOR_SPI:
900			if (guidcmp(img_guid, &STM32MP_NOR_FIP_A_GUID) == 0) {
901				image_spec->offset = STM32MP_NOR_FIP_A_OFFSET;
902			} else if (guidcmp(img_guid, &STM32MP_NOR_FIP_B_GUID) == 0) {
903				image_spec->offset = STM32MP_NOR_FIP_B_OFFSET;
904			} else {
905				ERROR("Invalid uuid mentioned in metadata\n");
906				panic();
907			}
908			break;
909#endif
910#if (STM32MP_RAW_NAND || STM32MP_SPI_NAND)
911		case BOOT_API_CTX_BOOT_INTERFACE_SEL_FLASH_NAND_FMC:
912		case BOOT_API_CTX_BOOT_INTERFACE_SEL_FLASH_NAND_SPI:
913			if (guidcmp(img_guid, &STM32MP_NAND_FIP_A_GUID) == 0) {
914				image_spec->offset = STM32MP_NAND_FIP_A_OFFSET;
915			} else if (guidcmp(img_guid, &STM32MP_NAND_FIP_B_GUID) == 0) {
916				image_spec->offset = STM32MP_NAND_FIP_B_OFFSET;
917			} else {
918				ERROR("Invalid uuid mentioned in metadata\n");
919				panic();
920			}
921			break;
922#endif
923#if STM32MP_HYPERFLASH
924		case BOOT_API_CTX_BOOT_INTERFACE_SEL_HYPERFLASH_OSPI:
925			if (guidcmp(img_guid, &STM32MP_HYPERFLASH_FIP_A_GUID) == 0) {
926				image_spec->offset = STM32MP_HYPERFLASH_FIP_A_OFFSET;
927			} else if (guidcmp(img_guid, &STM32MP_HYPERFLASH_FIP_B_GUID) == 0) {
928				image_spec->offset = STM32MP_HYPERFLASH_FIP_B_OFFSET;
929			} else {
930				ERROR("Invalid uuid mentioned in metadata\n");
931				panic();
932			}
933			break;
934#endif
935		default:
936			panic();
937			break;
938		}
939	}
940}
vediamo che a seconda di quale interfaccia è stata usata
per fare il boot (sd card, emmc, flash nand, …)
vengano utilizzati differenti modi per individuare
la partizione metadata che ci interessa.
Dentro questa compare un’altra funzione interessante (plat_fwu_get_boot_idx)
che fa parte delle API che un nuova piattaforma deve implementare per
poter utilizzare correttamente il driver fwu.
Questa è definita nel medesimo file, poco più in alto:
775#if PSA_FWU_SUPPORT
776/*
777 * In each boot in non-trial mode, we set the BKP register to
778 * FWU_MAX_TRIAL_REBOOT, and return the active_index from metadata.
779 *
780 * As long as the update agent didn't update the "accepted" field in metadata
781 * (i.e. we are in trial mode), we select the new active_index.
782 * To avoid infinite boot loop at trial boot we decrement a BKP register.
783 * If this counter is 0:
784 *     - an unexpected TAMPER event raised (that resets the BKP registers to 0)
785 *     - a power-off occurs before the update agent was able to update the
786 *       "accepted' field
787 *     - we already boot FWU_MAX_TRIAL_REBOOT times in trial mode.
788 * we select the previous_active_index.
789 */
790uint32_t plat_fwu_get_boot_idx(void)
791{
792	/*
793	 * Select boot index and update boot counter only once per boot
794	 * even if this function is called several times.
795	 */
796	static uint32_t boot_idx = INVALID_BOOT_IDX;
797	int err = 0;
798
799	if (boot_idx == INVALID_BOOT_IDX) {
800		const struct fwu_metadata *data = fwu_get_metadata();
801		uint32_t bootcount = 0;
802
803		boot_idx = data->active_index;
804
805		switch (data->bank_state[boot_idx]) {
806		case FWU_BANK_STATE_ACCEPTED:
807			err = stm32_set_max_fwu_trial_boot_cnt();
808			break;
809		case FWU_BANK_STATE_VALID:
810			err = stm32_get_and_dec_fwu_trial_boot_cnt(&bootcount);
811			if (err == 0) {
812				if (bootcount == 1U) {
813					WARN("Trial FWU fails %u times\n",
814					     (FWU_MAX_TRIAL_REBOOT - 1U));
815					boot_idx = fwu_get_alternate_boot_bank();
816				} else if (bootcount == 0U) {
817					WARN("Trial backup register empty : set max boot count\n");
818					err = stm32_set_max_fwu_trial_boot_cnt();
819				} else {
820					VERBOSE("Trial FWU: %u\n",
821						FWU_MAX_TRIAL_REBOOT - bootcount);
822				}
823			}
824			break;
825		case FWU_BANK_STATE_INVALID:
826		default:
827			ERROR("The active bank(%u) of the platform is in Invalid State.\n",
828			      boot_idx);
829			boot_idx = fwu_get_alternate_boot_bank();
830			err = stm32_clear_fwu_trial_boot_cnt();
831			break;
832		}
833
834		if (err != 0) {
835			ERROR("%s: Bkp register access failed. Bank state: %d\n",
836				__func__, data->bank_state[boot_idx]);
837			panic();
838		}
839	}
840
841	return boot_idx;
842}
Qua possiamo vedere esattamente dove è implementata la logica
che definisce le azioni da fare a seconda del bank_state
che leggiamo.
Vediamo che vengono utilizzate un mistro fra funzioni
generiche del driver fwu
e funzioni specifiche di ST:
799if (boot_idx == INVALID_BOOT_IDX) {
800	const struct fwu_metadata *data = fwu_get_metadata();
801	uint32_t bootcount = 0;
802
803	boot_idx = data->active_index;
804
805	switch (data->bank_state[boot_idx]) {
806	case FWU_BANK_STATE_ACCEPTED:
807		err = stm32_set_max_fwu_trial_boot_cnt();
808		break;
809	case FWU_BANK_STATE_VALID:
810		err = stm32_get_and_dec_fwu_trial_boot_cnt(&bootcount);
811		if (err == 0) {
812			if (bootcount == 1U) {
813				WARN("Trial FWU fails %u times\n",
814						(FWU_MAX_TRIAL_REBOOT - 1U));
815				boot_idx = fwu_get_alternate_boot_bank();
816			} else if (bootcount == 0U) {
817				WARN("Trial backup register empty : set max boot count\n");
818				err = stm32_set_max_fwu_trial_boot_cnt();
819			} else {
820				VERBOSE("Trial FWU: %u\n",
821					FWU_MAX_TRIAL_REBOOT - bootcount);
822			}
823		}
824		break;
Ad esempio:
fwu_get_alternate_boot_bank()
è interessante perchè oltre alla semplice lettura di “previous_active_state” fa anche dei controlli se questa è “accepted” e in caso negativo, cerca un diverso index associato ad una “bank_state valid o accepted”
stm32_set_max_fwu_trial_boot_cnt()
come anche le altre funzioni stm evidenziate, questa interagisce con il registro “trial_boot_cnt”, che si trova in una zona di memoria protetta e non accessibile da programmi nel normal world. Se proviamo a farlo, vedremo che l’intero sistema va in fault a causa di un errore generato da optee.
Una altra cosa molto importante è che il metadata che otteniamo dalla funzione
const struct fwu_metadata *data = fwu_get_metadata();
è un puntatore a const struct, quindi read-only.
Se proviamo a modificarne dei campi,
il compilatore andrà in errore.
Per risolvere il problema non possiamo
fare un cast ad un puntatore di struct fwu_metadata
perchè appunto non è permesso.
La soluzione sarebbe quella di ridefinire tale
struct in tutto il codice,
ma oltre che una gran rottura di cazzi
è anche estremamente non consigliato.
Quindi visto che noi vogliamo poter modificare i dati presenti in tale struct, cerchiamo un’ altra strada.
Vi presento il mitico OPTEEE. Scherzo, l’ho odiato con tutto il cuore.
Prima di iniziare a imprecare su quello, però,
dobbiamo parlare di una altra cosa.
Ricordate la zona di memoria protetta? Spero,
comunque possiamo capire dove si trova esplorando
una delle funzioni stm che interagisce con
il trial_boot_cnt:
717int stm32_set_max_fwu_trial_boot_cnt(void)
718{
719	struct nvmem_cell fwu_info_cell = {};
720
721	int ret = stm32_get_fwu_info_cell(&fwu_info_cell);
722
723	if (ret != 0) {
724		return ret;
725	}
726
727	return stm32_nvmem_cell_clrset(&fwu_info_cell, FWU_INFO_CNT_MSK,
728				       (FWU_MAX_TRIAL_REBOOT << FWU_INFO_CNT_OFF) &
729				       FWU_INFO_CNT_MSK);
730}
In cui, per farla breve,
stm32_get_fwu_info_cell(&fwu_info_cell)
cerca nel device tree, che utilizziamo per compilare il TFA,
dove si trova il nodo boot-info
e avente una nvmem-cell associata a fwu-info.
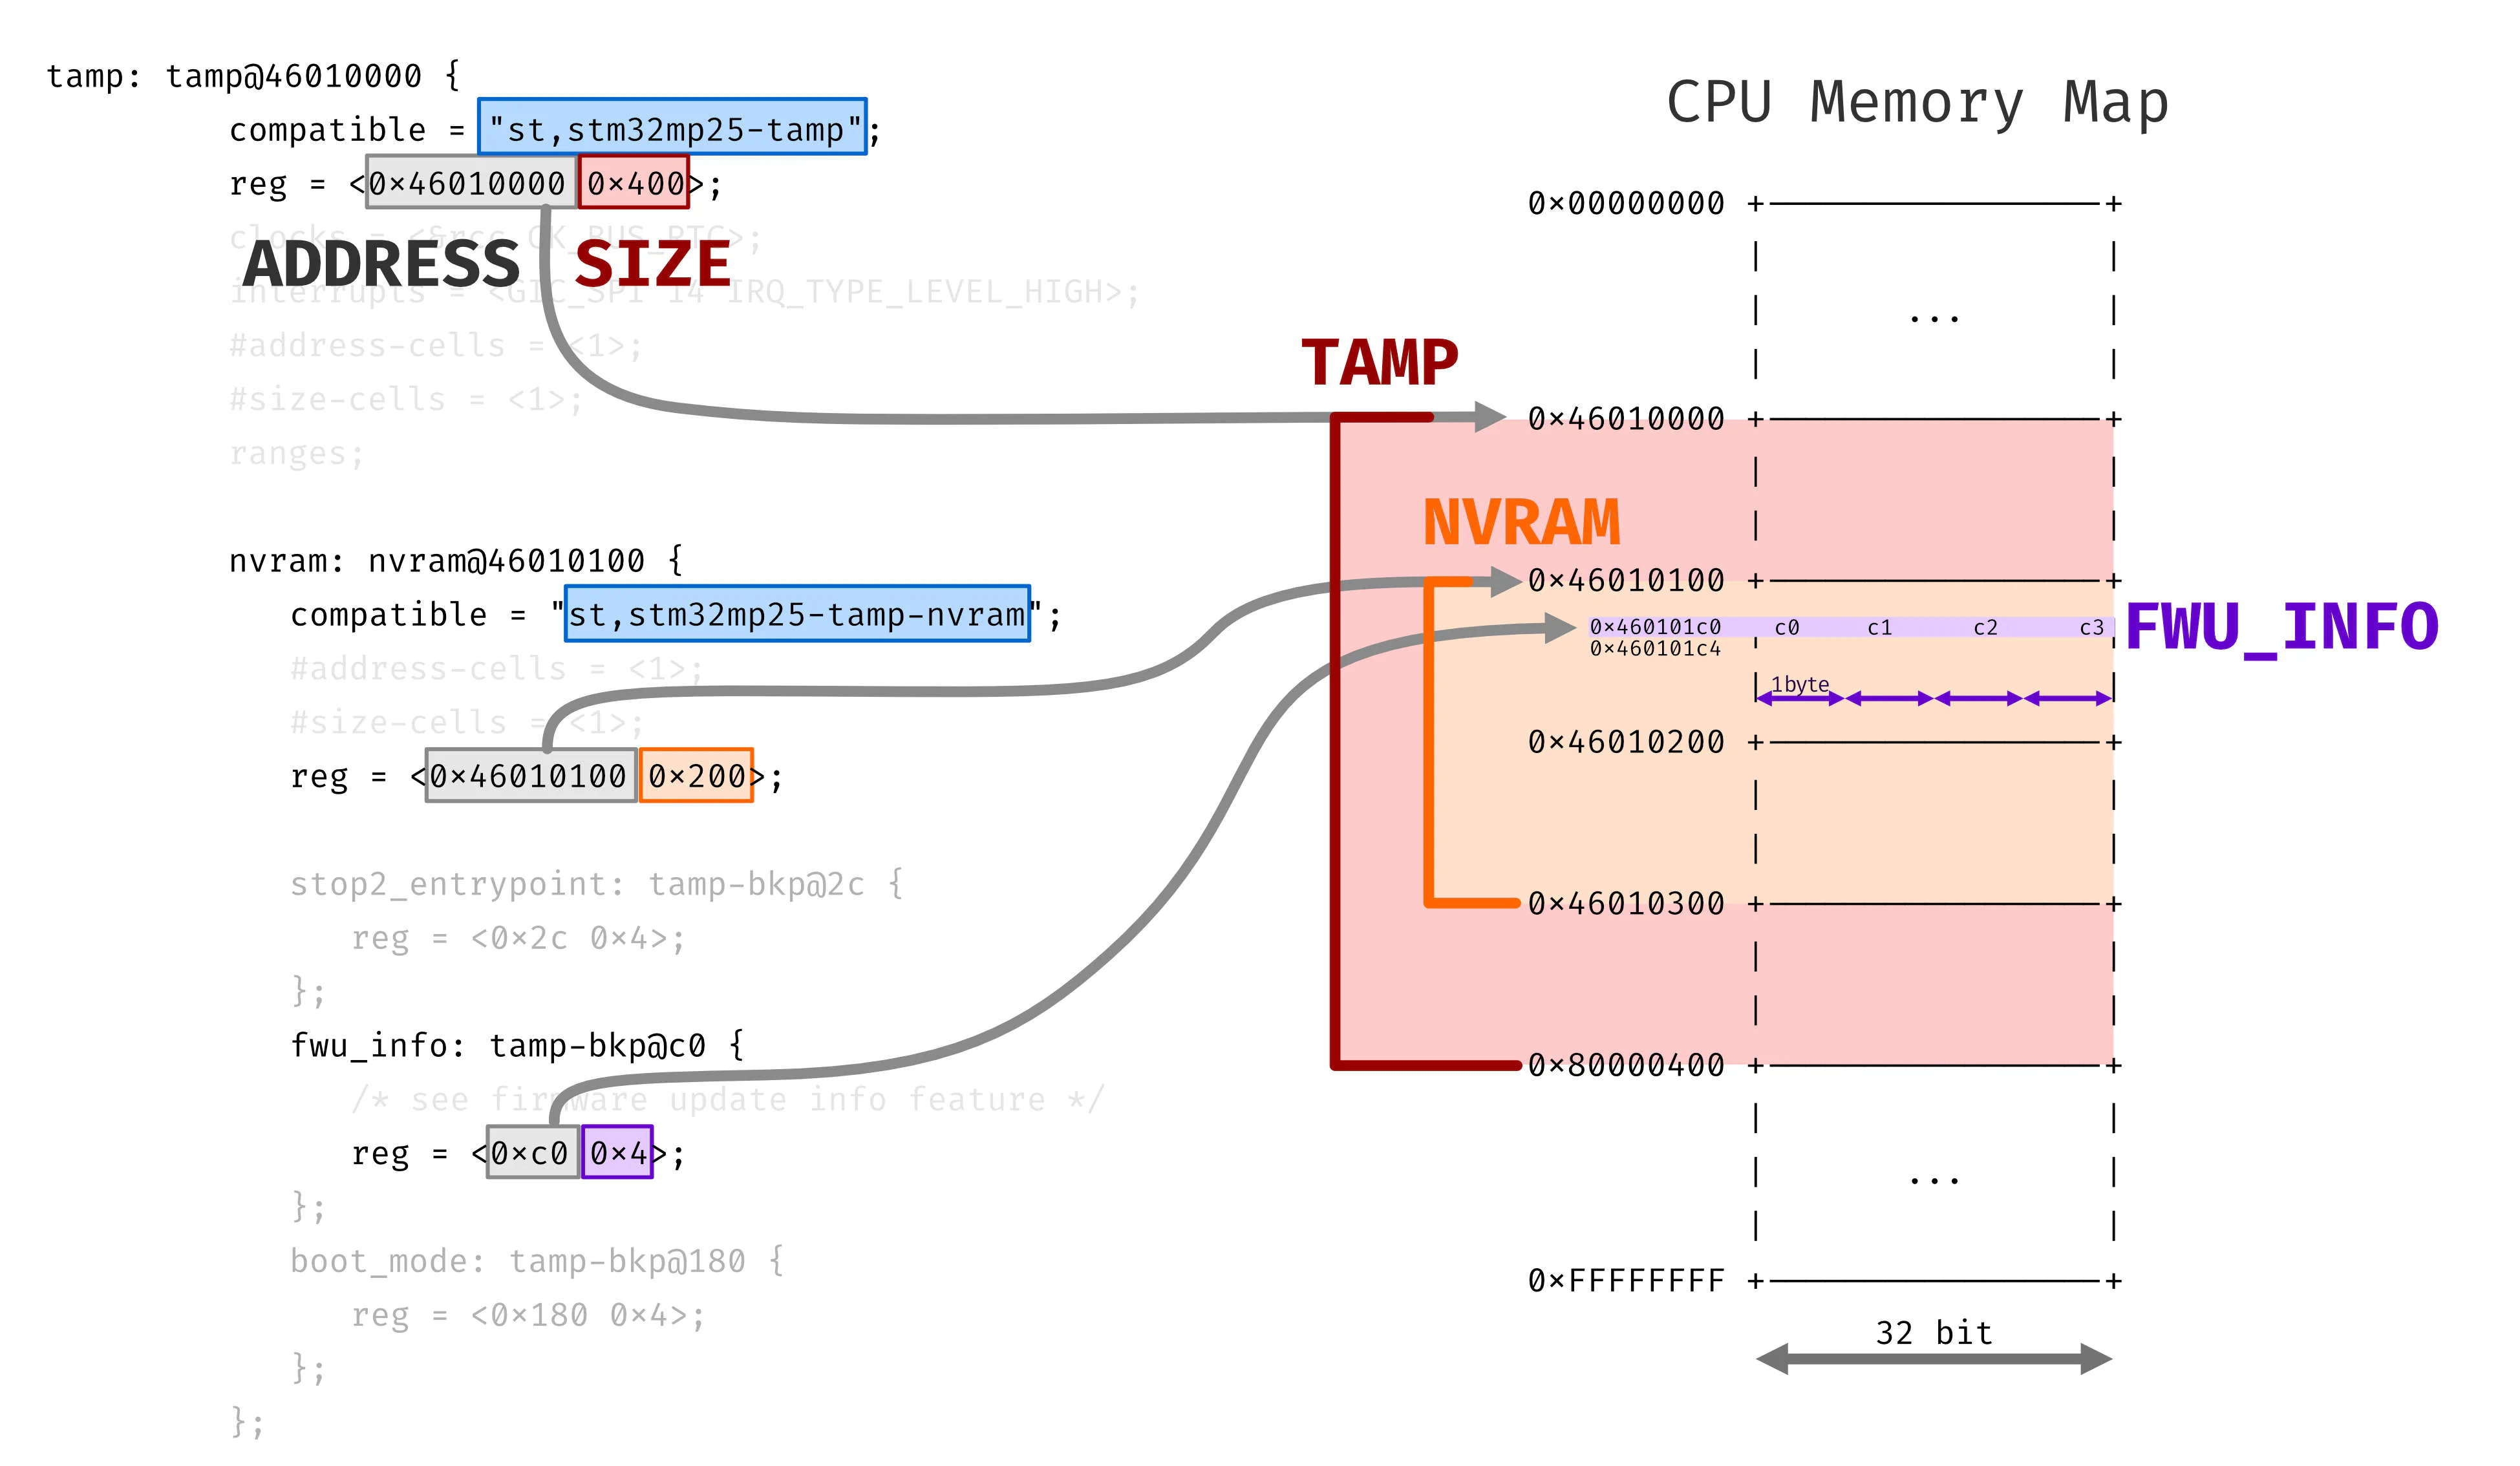
Questa rimanda al nodo fwu_info
definito all’ interno della nvram
del tamp
441tamp: tamp@46010000 {
442	compatible = "st,stm32mp25-tamp";
443	reg = <0x46010000 0x400>;
444	clocks = <&rcc CK_BUS_RTC>;
445	interrupts = <GIC_SPI 14 IRQ_TYPE_LEVEL_HIGH>;
446	#address-cells = <1>;
447	#size-cells = <1>;
448	ranges;
449
450	nvram: nvram@46010100 {
451		compatible = "st,stm32mp25-tamp-nvram";
452		#address-cells = <1>;
453		#size-cells = <1>;
454		reg = <0x46010100 0x200>;
455
456		stop2_entrypoint: tamp-bkp@2c {
457			reg = <0x2c 0x4>;
458		};
459		fwu_info: tamp-bkp@c0 {
460			/* see firmware update info feature */
461			reg = <0xc0 0x4>;
462		};
463		boot_mode: tamp-bkp@180 {
464			reg = <0x180 0x4>;
465		};
466
467	};
468
469	boot_info: boot-info {
470		compatible = "st,stm32mp-bootinfo";
471		nvmem-cells = <&boot_mode>, <&fwu_info>, <&stop2_entrypoint>;
472		nvmem-cell-names = "boot-mode", "fwu-info", "stop2-entrypoint";
473	};
474};
La “nvram” del “tamp” mi ricorda molto la mach del cap ha un buc nella gom ma e noi la ripariamo con il ciuing a m
Comunque da questo deduciamo l’indirizzo di memoria che ci interessa,
calcolando gli offset a partire da quello del nodo nvram
Dobbiamo però stare attenti, perchè
se da una console uboot provassimo a fare
un dump del primo byte della memoria tamp vedremmo
un fault generato da optee e il sistema
diventerebbe inusabile.
Almeno fino allo scadere del watchdog (se presente).
STM32MP>md.b 0x46010000 1
E/TC:0   stm32_iac_itr:192 IAC exceptions \[159:128\]: 0x1000000
E/TC:0   stm32_iac_itr:197 IAC exception ID: 152
E/TC:0   Panic at /usr/src/debug/optee-os/4.0.0-stm32mp/core/drivers/firewall/stm32_iac.c:212 <stm32_iac_itr>
E/TC:0   TEE load address @ 0x82000000
E/TC:0   Call stack:
E/TC:0    0x82007fa0
E/TC:0    0x820441c0
E/TC:0    0x8202de1c
E/TC:0    0x82041c40
E/TC:0    0x8201451c
Dove
	   E/TC
severity --'  '-- component
Le principali severity sono:
E ErrorW WarningI InfoD DebugI principali component sono:
TC Tee CoreTA Trusted ApplicationE vengono visualizzate in base al log level con cui è stato compilato OPTEE.
Per maggiori dettagli esiste la documentazione ufficiale di OPTEE
su come analizzarne i dump
Concludendo, sappiamo ora che TFA è configurato per darci l’informazione di quale index FIP è stato usato per avviare UBOOT e sappiamo anche dove si trova questa. Adesso rimane da capire come leggere e scrivere tale valore, possibilmente sia che ci troviamo in UBOOT, sia che ci troviamo in Linux.
Reference Manual ST RM0457 sezione 75
Il TAMP è una periferica che blocca accessi non autorizzati
alla memoria del dispositivo.
È un dispositivo hardware, non software, e quindi
blocca qualsiasi tipo di accesso fisico/elettronico.
Al suo interno ospita i Backup Registers,
utilizzati per scambiare informazioni tra i vari stage
della bootchain.
Per maggiori dettagli, l' articolo sulla wiki ST.
Il TAMP è composto da 128 registri a 32 bit
suddivisi in:
TAMP_SECCFGR secure configuration registersTAMP_BKPxR backup registersInoltre è suddiviso in 3 zone:
Ciascuna zona è sottodivisa in vari RIF,
a seconda di quale core ha accesso o meno,
dove:
RIF0 cortex a35 o m33 (trusted domain)RIF1 cortex a35RIF2 cortex m33Schema dettagliato sulla wiki ST.
La nvram ospita i backup registers,
ovvero delle zone di memoria non volatile
a basso consumo.
La nvram contiene 128 registri,
dei 256 totali del tamp.
Per racchiudere queste informazioni
ed utilizzarle all’interno di
molteplici componenti software
si usa il device tree,
come quello già visto prima
all’interno del TFA:
Nel device tree la stringa compatible
definisce il driver che verrà effettivamente
utilizzato dal software in questione
per interagire con la zona di memoria.
Questo definisce quindi il significato che assume
il parametro reg.
Questo solitamente rappresenta
l’indirizzo in memoria e
l’estensione del dato.
Nel caso della nvram si nota che
l’indirizzo è inteso come assoluto,
mentre per i singoli backup registers
questo è relativo rispetto l’inizio
della nvram, risultando quindi un offset.
Possiamo confermare quanto detto facendo un fact checking dei dati che troviamo nella tabella di ST.
boot_mode: tamp-bkp@180 {
	reg = <0x180 0x4>;
};
ADDRESS = 0x180 (bytes hex) = 384 (bytes dec)
SIZE = 4 (bytes hex) = 4 (bytes dec)
il numero di registro è ADDRESS in decimale
diviso per la dimensione in byte di un registro
NUMERO_REGISTRO = 384 / 4 = 96 decinfatti dalla tabella vediamo proprio:
TAMP_BKP96R = BOOT_MODE con permessi Zone3-RIF1e anche la seguente voce ci torna:
fwu_info: tamp-bkp@c0 {
	/* see firmware update info feature */
	reg = <0xc0 0x4>;
};
ADDRESS = 0xc0 (bytes hex) = 192 (bytes dec)
SIZE = 4 (bytes hex) = 4 (bytes dec)
il numero di registro è ADDRESS in decimale
diviso per la dimensione in byte di un registro
NUMERO_REGISTRO = 192 / 4 = 48 decTAMP_BKP48R = FWU_INFO con permessi Zone2-RIF1Quindi, vedendo i permessi
Zona 2 => Read non secure, Write secure
RIF1   => cortex a35
Questo registro ammette
la scrittura solo per il SecureWorld,
ma la lettura per il NormalWorld,
quindi sia da UBOOT che Linux
(se la richiesta è fatta dal core A35).
F A N T A ST I C O
ok quindi adesso sappiamo che possiamo leggere quel registro. Ma che valori dobbiamo aspettarci? Tornando al codice del TFA, lo vediamo da una funzione che viene chiamata per settare il boot_index, ovvero:
665int stm32_fwu_set_boot_idx(void)
666{
667	struct nvmem_cell fwu_info = {};
668	int ret = 0;
669
670	uint32_t clear = FWU_INFO_IDX_MSK;
671	uint32_t set = (plat_fwu_get_boot_idx() << FWU_INFO_IDX_OFF) &
672		       FWU_INFO_IDX_MSK;
673
674	ret = stm32_get_fwu_info_cell(&fwu_info);
675	if (ret != 0) {
676		return ret;
677	}
678
679	return stm32_nvmem_cell_clrset(&fwu_info, clear, set);
680}
concentrandoci sui valori di clear e set, andiamo a cercare le definizioni utilizzate:
61/* Layout for fwu update information. */
62#define FWU_INFO_IDX_MSK		GENMASK(3, 0)
63#define FWU_INFO_IDX_OFF		U(0)
64#define FWU_INFO_CNT_MSK		GENMASK(7, 4)
65#define FWU_INFO_CNT_OFF		U(4)
quindi cerchiamo anche la definizione della macro GENMASK
e vediamo che crea una word a 32 o 64 bit
(a seconda dell’architettura del soc)
contenente solo 1 tra le due posizioni date, comprese.
31/*
32 * Create a contiguous bitmask starting at bit position @l and ending at
33 * position @h. For example
34 * GENMASK_64(39, 21) gives us the 64bit vector 0x000000ffffe00000.
35 */
36#if defined(__LINKER__) || defined(__ASSEMBLER__)
37#define GENMASK_32(h, l) \
38	(((0xFFFFFFFF) << (l)) & (0xFFFFFFFF >> (32 - 1 - (h))))
39
40#define GENMASK_64(h, l) \
41	((~0 << (l)) & (~0 >> (64 - 1 - (h))))
42#else
43#define GENMASK_32(h, l) \
44	(((~UINT32_C(0)) << (l)) & (~UINT32_C(0) >> (32 - 1 - (h))))
45
46#define GENMASK_64(h, l) \
47	(((~UINT64_C(0)) << (l)) & (~UINT64_C(0) >> (64 - 1 - (h))))
48#endif
49
50#ifdef __aarch64__
51#define GENMASK				GENMASK_64
52#else
53#define GENMASK				GENMASK_32
54#endif
quindi il valore di boot_index occupa i primi 4 bit del registro e analogamente il valore boot_count occupa i successivi 4 bit del registro.
Da una shell di uboot possiamo fare un memory dump di 4 byte partendo dall’indirizzo del registro:
STM32MP> md.b 0x460101C0 4
460101c0: 40 00 00 00
oppure un memory dump di un long (4 byte):
STM32MP> md.l 0x460101C0 1
460101c0: 00000040
Stiamo attenti all’ordine dei byte e quindi prendiamo il primo byte (8 bits) e lo spezziamo a metà:
      4 0
cnt --' '-- idx

cnt = 4 hex = 4 dec  --> numero tentativi disponibili
idx = 0 hex = 0 dec --> indice slot FIP usato per questo bootAdesso ci basta implementare un comando UBOOT che ci permetta di leggere questa zona di memoria e stampare a schermo delle informazioni utili. Questo lo potremo poi utilizzare nei nostri script UBOOT per capire lo stato in cui il TFA ci ha lasciato.
Per un metodo un po’ più elegante, nel comando possiamo capire la zona di memoria andando a leggere il device tree e calcolando l’indirizzo esatto.
Un’altra alternativa è implementare questo processo come Trusted Application da poter utilizzare dentro OPTEE e chiamare il server OPTEE da UBOOT o Linux.
Tralasciando per il momento come fare queste modifiche tramite Yocto, per aggiungere un comando in UBOOT ci basta aggiungere i seguenti file:
.h in include/.c in cmd/e inserirli nella catena di compilazione, aggiungendo
una variabile KCONFIG che pilota
la compilazione tramite MAKE.
Ovvero le seguenti modifiche ai file
Kconfig e Makefile all’interno della cartella cmd/.
173config CMD_FWU_METADATA
174	bool "fwu metadata read"
175	depends on FWU_MULTI_BANK_UPDATE
176	help
177	  Command to read the metadata and dump it's contents
178
179config CMD_FWU_CUSTOM
180	bool "custom fwu command"
181	depends on FWU_METADATA
182	help
183	  Custom command to manage firmware updates
184
185config CMD_LICENSE
186	bool "license"
187	select BUILD_BIN2C
188	help
189 Print GPL license text90obj-$(CONFIG_CMD_FUSE) += fuse.o
91obj-$(CONFIG_CMD_FWU_METADATA) += fwu_mdata.o
92obj-$(CONFIG_CMD_FWU_CUSTOM) += fwu_custom.o
93obj-$(CONFIG_CMD_GETTIME) += gettime.o
94obj-$(CONFIG_CMD_GPIO) += gpio.oLa cosa importante è i file .h e .c
abbiano lo stesso nome e che
nel Makefile utilizziamo questo nome per indicare
il file .o risultante dalla compilazione.
Ad esempio possiamo usare fwu_custom come nome,
rispettando però le estensioni dei vari file.
codice comando uboot

implementazione TA optee