Title here
Summary here
The digital world runs on Linux.
Kind of. Okay, on desktops it’s still a bit of a niche thing (as long as Windows isn’t on its last legs), but in the server world, Linux DOMINATES. In the field of embedded systems, it has begun to gain ground very quickly, as it allows compact systems to be built using the same software available on desktops and servers. By embedded, I mean all those devices that are officially computers, but at first glance do not look like it. Such as almost all smart appliances (refrigerators, TVs, etc.), many control unitsfor cars and industrial machinery, in short, almost all electronic devices.
Not all of them, because in reality, those that have less need for networking, more need for precise hardware control, and do not have high demands for process parallelism are based on microcontrollers or even digital/analog circuits.
Linux is not the solution to all problems (cough cough… Windows is not even a solution), but its modularity, configurability, and accessibility have made it a powerful tool suitable for solving a wide range of problems.
So much so that there are countless variants of operating systems based on Linux.
Even Android is based on Linux and continues to follow its development.
To be precise, “Linux” refers to the main component of an operating system, the kernel.
This is the main program responsible for managing the available hardware resources.
On top of this, we have a fuck-ton of applications/software and various programs.
Of these, the main ones are those born from the GNU project,
i.e., the main utilities found in every Linux-based system, such as the commands:
cp   --> copy
mv   --> move
ls   --> list
dd   --> data duplicator
grep --> global regular expression print
and so on…
These are so indispensable that we usually talk about GNU/Linux, rather than just Linux.
And then, of course, there are all the other commands and various applications.
Each combination of kernel + applications is called a distribution.
Among the most famous Linux distributions are:
In short, try searching the internet and see how many come up. Be careful, though, because it’s literally an endless rabbit hole.
Okay, so what the hell does Yocto have to do with all this? Creating a distribution is a mess. It takes a lot of time and energy to make sure everything is configured properly. Then, if you have to make changes, you also have to double-check that everything still works as it should. What could possibly go wrong, you may ask?
CONFLICTING PACKAGES, FOR INSTANCE.
All software has dependencies, and multiple pieces of software often share dependencies. However, when one of these gets updated, it is likely that the required versions of its dependencies will also change. What if some new versions are no longer compatible with the old ones? What if you have to keep an old dependency for certain software and a newer one for other software? What if you discover that you cannot use one of these dependencies for licensing reasons? What if you just give up and take up farming? Don’t worry, we’ve all been there.
Then, among other problems, there is the big issue that some software also requires specific hardware. Like, what’s the point of an HDMI controller if your 2000s PC only has VGA? Or how does the software know you have a touchscreen monitor? What if you don’t even have a monitor?
There are so many variables that can ruin the PC user experience. In the embedded field, there are even more variables because there are many more types of peripherals and they often require special drivers. These are complex peripherals that we don’t usually find on PCs and servers, such as CAN, I2C, and ADC, just to name a few.
Yocto is a valid solution for creating Linux kernel-based distributions that are highly specific to your needs. It is not a single magical distribution, but rather a configurator. The technical term is “build system”, meaning a system that, starting from well-defined instructions, creates a well-defined product. And I assure you that the level of definition is extremely high. It is not the only tool of its kind. There is also Buildroot and then, I don’t know what else. For embedded systems, these are the main two. For desktops and servers, there are others, but they are often not usable for what we want to do here.
Okay, now let’s take a coffee break and then we can continue. You’re having fun, aren’t you?
Yocto is a project derived from the build system
openembedded,
based around the tool
bitbake,
which is essentially a bundle of
Python scripts.
Generally, the terms Yocto, Openembedded, and Bitbake are used interchangeably. In short, Yocto is the system that replaced the openembedded system, and both include:
Bitbake defines the syntax of .bb, .bbappend, and .conf files
and the basic mechanisms for managing interactions between these files
and the dependencies between the tasks defined within them.
Yocto leverages these mechanisms to describe what it calls recipes,
that is the basic tasks required to compile a given source code,
move certain build outputs to specific folders,
define metadata associated with that software, and much more.
It then defines layers, which are groups of recipes
and contain additional metadata.
In addition to these, it also defines a series of specific mechanisms
to facilitate the most common operations for developing
kernels, bootloaders, memory card partitions, and more.
Finally, it groups all these tools into base layers,
which are precisely those that must be included in every Yocto-based project.
Be mindful that at its core there are many Python scripts, so all these additional mechanisms can always be inspected. That is very helpful when the documentation is not enough, or when we want to add additional features.
In fact, to add functionality, we will not directly modify these scripts, but we will use the mechanisms provided to us to be able to “do things exactly as we want”.
Another very important thing to keep in mind is that most of Yocto’s configuration is managed through more or less global variables, so we will often find ourselves navigating code to understand how and where certain variables are used and modified.
Well, that was the introduction, now let’s take a few more steps.
Now that we have a rough idea of what the components are, let’s try to understand how they are actually used.
Every Yocto project starts with the inclusion of the base layer,
usually called
meta.
This is because it does not contain anything useful by itself,
but only provides instructions on how to use something that already exists.
In fact, we will see that Yocto recipes do not contain
the actual source code of a software,
but only references to where to find it
(for example, on which GitHub repository),
what tools are needed to compile it (Make, Meson, etc.),
what commands to run to compile and configure it,
and so on.
Therefore, a Yocto layer corresponds to the general definition of metadata,
hence the convention of giving a name beginning with meta-
to any Yocto layer.
For example:
And so on and so forth. It’s not a fixed rule, just a convention.
The base layer was therefore simply called meta.
It contains the main recipes for building
the most common software, such as:
And many, many more. To this you also have to add other components, such as bitbake and some scripts. There are various repositories that contain everything you need to get started, and they are basically the same:
Well, in the latest versions, they have changed things a bit,
and the poky repository no longer contains anything,
in favor of using the command
bitbake-setup
So in the latest versions, just clone the bitbake repository
and use the command
./bin/bitbake-setup init
Yes, it’s mental, and things can change a lot from “version to version”. That’s why it’s time to talk about the various versions of Yocto. Don’t worry, in the next few articles, we’ll see how to set it up starting from scratch, and in the end we’ll manage how to use Yocto, somehow.
The publicly available versions start from the year 2010, and it was only in 2022 that the first LTS (Long Term Support) versions began to exist, with the aim of making the Yocto ecosystem more stable. This is because a new version is released about twice a year, which often creates backward compatibility issues. Some of the versions:
Scarthgap is the most recent LTS (Long Term Support) version and will remain so until April 2028, as described on the official website. For a list of all versions, see the official website. Scarthgap is the version we will use in these articles, at least until 2028.
Who knows how many things will change by then. The setup of a Yocto project for sure.
So, returning to the main topic, a Yocto project consists of a bunch of folders and files, therefore you have to be careful as it is extremely easy to get lost.
A quick note: there are many variables that allow us to configure the location and name of the folders used in Yocto, but for now, let’s try to understand the standard layout.
At the top level, we have the layers folder and the build folder.
The first will contain all the layers we intend to use,
or even not use, in our project.
The second is where bitbake will generate all the necessary files.
layers
├── meta-arm
│    └── ...
└── meta
     ├── conf
     ├── recipes-bsp
     │    ├── u-boot
     │    │    └── u-boot.bb
     │    ├── usbutils
     │    │    └── usbutils.bb
     │    └── ...
     ├── recipes-kernel
     │    ├── linux
     │    │    ├── linux-yocto.bb
     │    │    └── linux-yocto-tiny.bb
     │    ├── kern-tools
     │    │    └── kern-tools.bb
     │    └── ...
     └── ...
Inside layers, we will find a folder for each layer
that we intend to use.
This is intended to be a simplified overview
and not a detailed list of what we find inside the meta layer.
Actually, in the folder hierarchy shown,
many things have been omitted and others simplified,
but it still helps us understand how to navigate it.
We will leave the detailed overview
for a future article dedicated solely to that topic.
Inside a single layer, we find:
The conf folder contains subfolders
and files to define the metadata associated with the layer.
The recipes- folders group multiple recipes,
and within these we find the .bb files
that actually define a recipe.
Inside build, things get complicated.
build
├── cache
├── conf
│     ├── bblayers.conf
│     └── local.conf
├── downloads
├── sstate-cache
└── tmp
In cache, we find the temporary bitbake files,
such as the database of hashes and recipes found.
In conf, we find the configuration files for our project.
There are essentially two:
bblayers.conf defines the layers actually used in the projectlocal.conf defines basic variables and allows us to override any other variableIn downloads, we find the tar files of the repositories
used by the various recipes in our project.
This folder acts as a local cache to avoid having to
re-download the repositories every time we want to run the build.
In sstate-cache, we find a myriad of folders that, in their last level,
contain the output files generated by certain tasks.
This folder acts as a local cache to avoid having to
re-execute tasks whose final effect is already known to bitbake.
In tmp, we find all the files generated during the build.
These can be the extracted and inspectable recipe repositories,
the intermediate files generated during the compilation of a recipe,
the output files of a recipe,
statistics on the timing of the builds performed,
and much, much more.
If we want to clean up a build,
we just need to delete this folder,
and Yocto’s goal is to be able to
recreate it EXACTLY the same (byte for byte)
only from the information contained
in the layers and in the conf folder.
To obtain an output that describes an entire operating system, Yocto follows these steps:
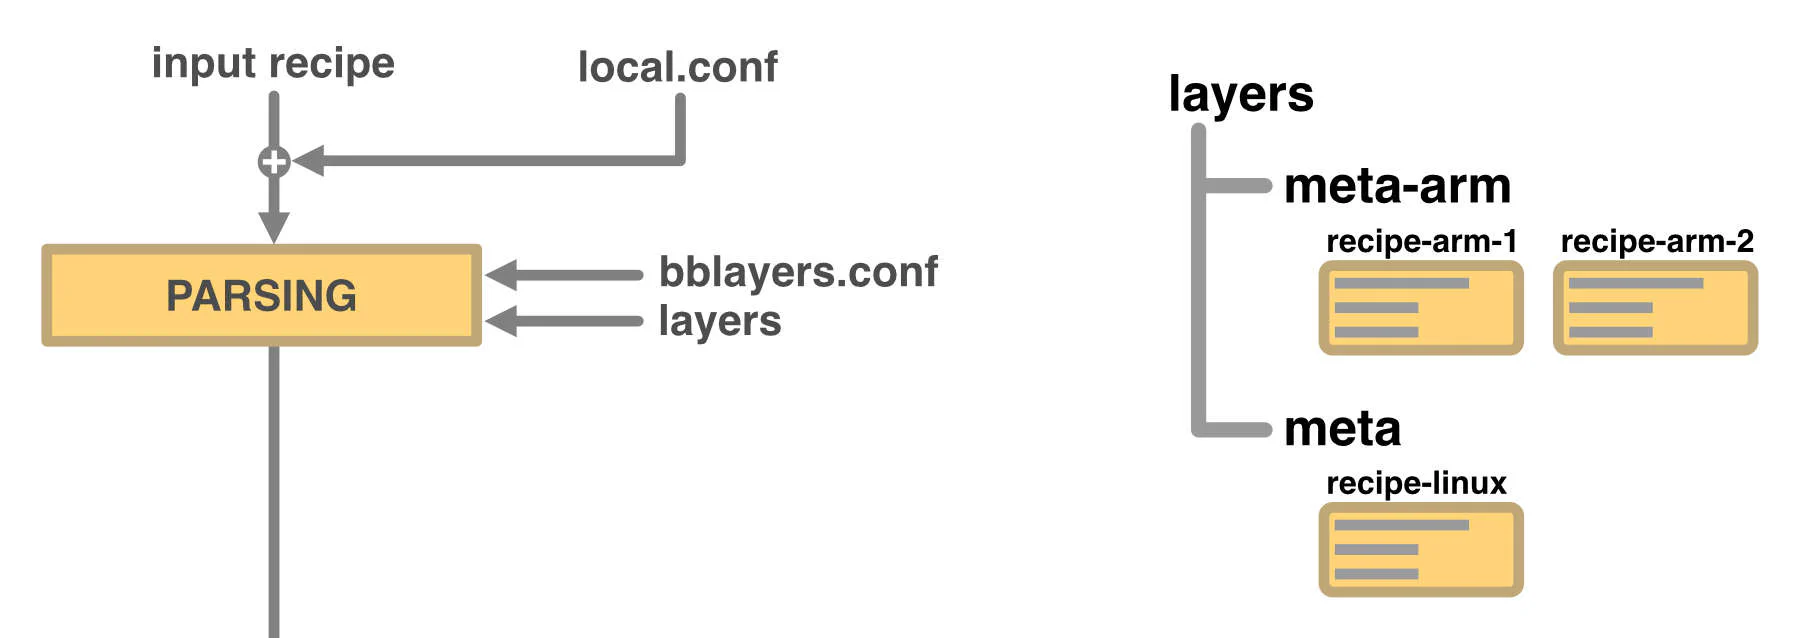
We tell bitbake to build a specific recipe.
Bitbake proceeds to read the project configuration,
applying the overrides described in local.conf
and activating the layers described in bblayers.conf.
It then proceeds to parse all the recipes
available within the selected layers and
searches for the recipe we have told it to build.
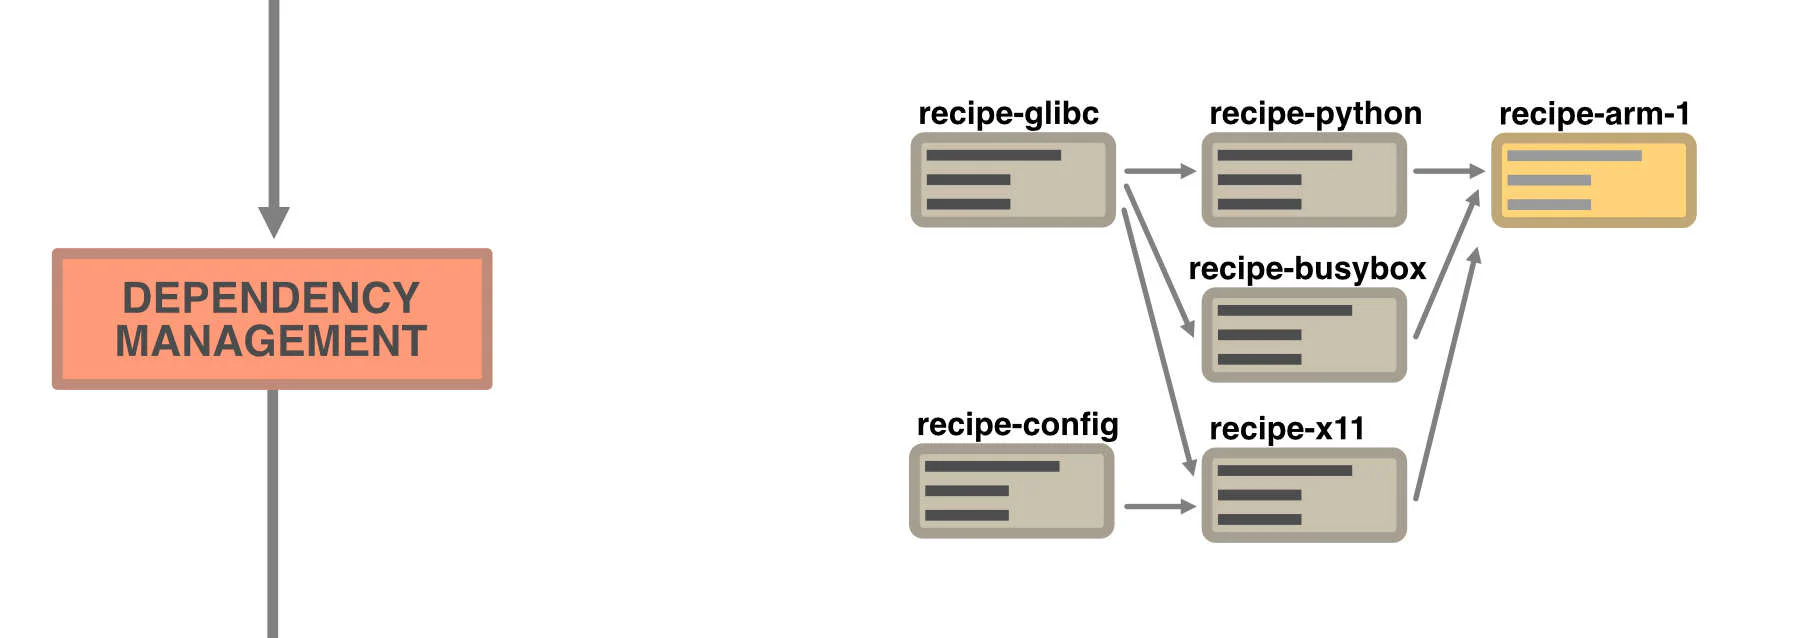
Before building the desired recipe,
bitbake checks its dependencies,
then generates an ordered list
of tasks to be performed in order to
be able to build the desired recipe.
If it finds that our project is missing
some recipes, the build fails.

The actual execution phase begins.
Bitbake runs all the necessary tasks,
trying to parallelize the execution as much as possible
and using the sstate-cache and downloads
to avoid re-running tasks whose final output it already knows,
thus speeding up the build.
For each recipe built, a fake-root filesystem is created
that simulates a
real Linux filesystem and is used
to understand where to place certain
output files of our recipe within
the final filesystem.
This is also used to then
generate a package which,
when installed, will apply these changes
to a generic filesystem.
The generation of packages is necessary,
because in order to build
the final root filesystem,
Yocto will create a clean filesystem
and then install all the
necessary packages,
thus ensuring a perfectly recreatable build.
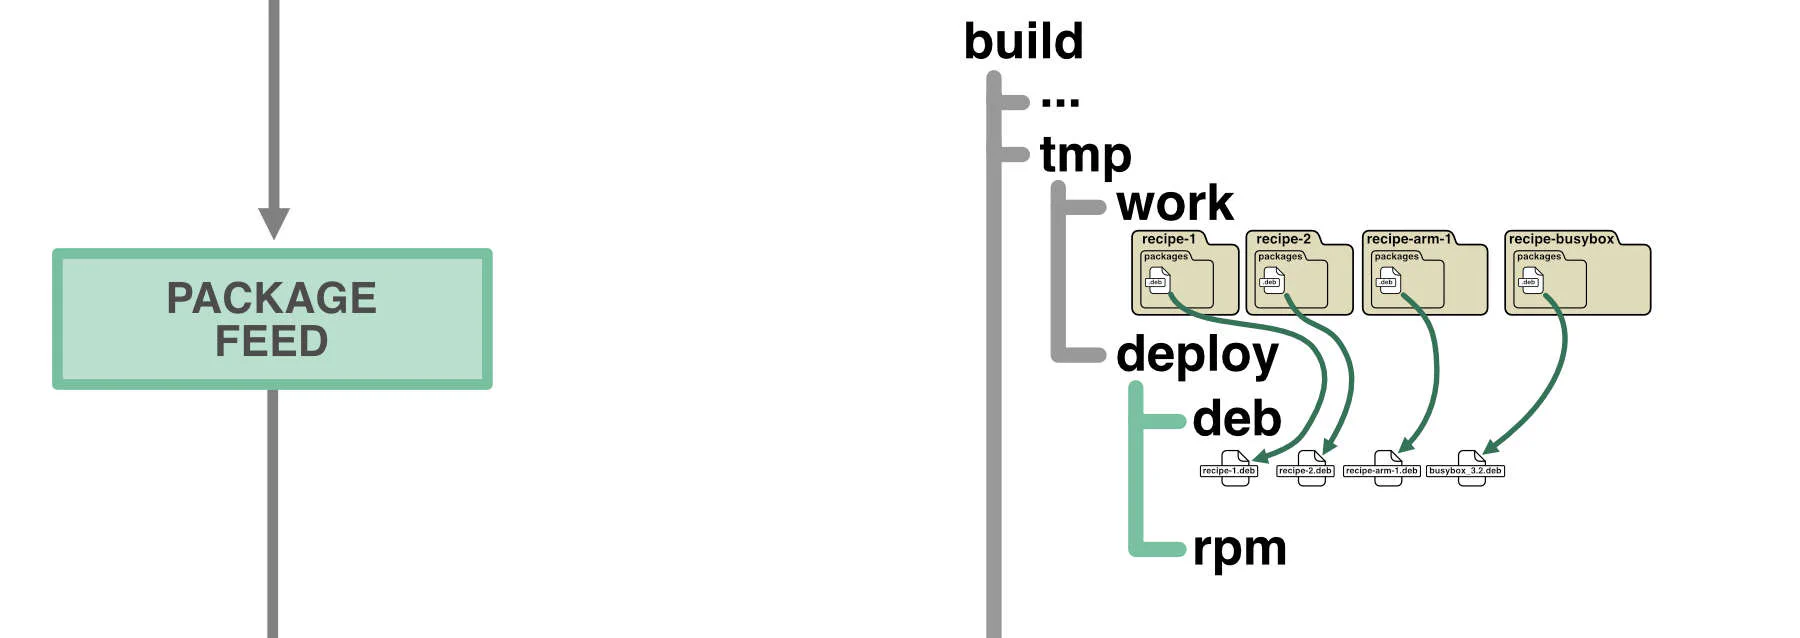
After each build of a recipe,
the corresponding package is
then saved in a package feed.
The package feed is also useful
if we want to
install additional packages
on the system once the build is complete.
All we need to do is transfer the package to
our device and install it.
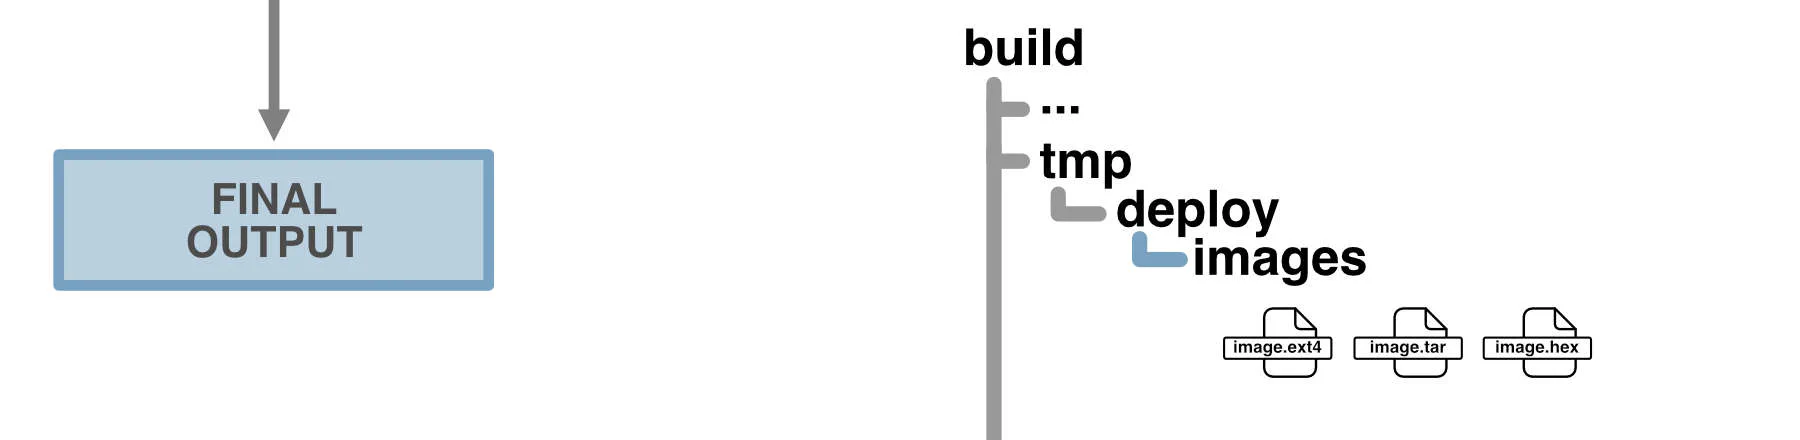
Once it has ensured that all the necessary components are present,
bitbake proceeds
with the creation of the requested recipe.
If the recipe defines an entire distribution,
it will generate files that allow you to
flash the entire firmware onto the device.
Well, that was the process in broad terms. For more details, try reading the official website.
This concludes our brief introduction to Yocto.
Now we are ready to start going into more detail
about how to create and manage
recipes, layers, and everything else that goes with them.